Using your KROWLER for the first time
Please follow this guide to get your KROWLER ready for its first use.
Washing and Sanitising
Keeping your KROWLER clean and free from bacteria is important for great tasting beers!
CO2 Pressure Guide
Setting the right CO2 pressure is important to prevent over/under carbonated beers.
Troubleshooting
Read here for troubleshooting tips to get the best use of your KROWLER.
TLDR - GENERAL WARNING
If you are the kind that scoff at instructions and prefer to wing it (we understand, we do too!), please read this section at the very least.
CAUTION
- Caution: contents under pressure. Misuse can be dangerous.
- Use precaution when handling CO2 cartridges and follow all instructions.
- Risk of cold burns - CO2 gas leaking rapidly may cause the cartridge to become very cold fast if installed incorrectly. Read the instructions on installing CO2 cartridges carefully.
- Always point the regulator outlet and purge/safety valve away from body when operating the KROWLER.
- If you are unsure if the contents in KROWLER are under pressure, always pull on the purge valve first before removing the cap.
DON'Ts
- Do not puncture or heat unused CO2 cartridges above 50°C or 120°F
- Do not over pressurise KROWLER beyond 30psi
- Do not remove the regulator with gas remaining in the CO2 cartridge from KROWLER without turning off the regulator first
- Do not remove CO2 cartridge from regulator when cartridge contains pressure
- Do not install CO2 cartridge into regulator before turning off the regulator first
- Do not store KROWLER sideways when filled with the regulator on (remove it first). Liquid may enter the guage and cause inaccurate readings.
Using your KROWLER for the first time

KROWLER PARTS
- Standard Beer Tap Handle (3/8"-16 UNC threads)
- Draft Beer Faucet
- Easy Carry Cap
- Stainless steel coupler with 30psi safety/purge valve and auto-seal valves
- Food-grade silicon dip tube
- Stainless steel vacuum insulated growler
- Dual stage mini CO2 regulator with pressure guage
- Food-grade 16g CO2 cartridge
There are 3 main components to using your KROWLER

1. Draft Beer Tap

2. Dual Stage Mini CO2 Regulator with 16g CO2 Cartridge

3. Stainless Steel Insulated Growler with Coupler
1. Draft Beer Tap Assembly

Step 1: Insert and screw in Tap Handle into Draft Beer Tap Body
Note: A rubber dust cap is included in the kit. Use it to keep the faucet clean during transportation and prevent drips.
2. Dual Stage Mini CO2 Regulator Assembly

Step 1: (Important) Switch off the regulator by turning the dial anti-clock wise in the “DECREASE” direction all the way
Step 2: Take one 16g Food-grade CO2 Cartridge and screw anti-clock wise into the regulator. (Important) Be careful not to cross threads and screw in the cartridge decisively untill the the cartridge touches the seal. About two thirds the way it, you may hear some gas escaping as the regulator punctures the seal on the cartridge. This is normal, continue to screw in the cartridge until it is sealed on the regulator. There is no need to over tighten.
3. Insulated Growler and Coupler Assembly

Step 1: Insert silicon dip tube into the coupler’s barbed spear
Step 2: Remove the cap from the insulated growler and screw it on to the top of the coupler
Step 3: Screw the coupler into the insulated growler

Final Assembly: Putting the components together

Attaching the Tap:
- Align the tap to the teeth on the coupler and screw the collar in.
Attaching the Gas Regulator:
- Ensure that the regulator is switched off before attaching or removing from the KROWLER
- Screw in the gas regulator with the CO2 canister
- Do not over-tighten. Over-tightening may damage the washer in the regulator and cause it to be stuck to the coupler. Note: The regulator does not need to be aligned straight with the bottle.
Note:
- You may remove each component of KROWLER as and when appropriate during use, specially designed valves will keep the contents pressurised and leak-free.
- When transporting the KROWLER, it is recommended to remove the tap to prevent accidental discharge of beer.
- You may also remove the regulator after pressurising the contents to the correct pressure for storage.
- Do not store the KROWLER sideways with the regulator on, remove the regulator first (the pressure in the KROWLER will hold).
Step 1: Make sure the KROWLER is clean and sanitised

A clean KROWLER will prevent bacteria from spoiling your beer. See “Washing and Sanitising” for tips on how to keep your KROWLER in tip-top condition!
Step 2: Fill it with your favourite craft beer

- Use a growler fill tube or tilt the KROWLER at an angle to prevent excessive foaming
- Chill your KROWLER or fill with cold water and dunk it out prior to filling. The cool surface will prevent excessive carbon dioxide from being released from the beer causing foam
- If you are not consuming your beer within the day, connect the regulator with CO2 cartridge and purge out the oxygen. (see following "Storing and Dispensing" for more information)
Note: Fill your KROWLER up to the correct level

- Fill your KROWLER up to the neck of the insulated growler (green line) do not fill past the regulator inlet and purge valve.
- The 2L KROWLER holds slightly more than four standard pints (473ml)
- The 3.8L KROWLER holds about 8 standard pints
Storing beer in your KROWLER for more than one day

It is a good idea to purge your KROWLER to prevent oxidation and pressurise it to the correct pressure to retain carbonation
Step 1: Attach the regulator with CO2 cartridge, slowly turn the regulator to about 5psi and turn it back off
Step 2: Wait a few seconds and pull the purge valve to purge out oxygen (CO2 is molecularly heavier than O2 and will settle to protect your beer). Repeat once more if you prefer
Step 3: Set the correct pressure for the type of beer and store in your refrigerator
Note: If storing side ways, remove the regulator first to prevent liquid from entering the pressure guage! Rotate the bottle so that the regulator valve is pointing up. Pressing any of the valves may cause a messy leak in your fridge. You may wish to place a paper towel underneath as a precaution.
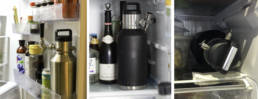
Many ways to store your KROWLER in your fridge:
To dispense from your KROWLER

- If the initial pressure is more than 1-2 PSI, pull the purge valve to bring the pressure down
- Slowly turn the regulator on to 1-2 PSI
- Tile your pint glass and pull the tap handle fully to dispense a perfect pint
- Increase or decrease the pressure as needed
- Note: if the beer has been over carbonated (at the Tap Room or during storage or agitated due to transportation) and pours with excessive foam, release the pressure from the purge valve and let the beer settle for a while
- Tip: Chill the tap together with your KROWLER to avoid a foamy first pour
ENJOY!
Washing and Sanitising
- Your KROWLER has been cleaned at the factory but may be slightly dusty from transportation
- Give it a good rinse with tap water before rinsing again with hot water
- We do not recommend using dish soap as soap residue may remain in the KROWLER and react with your beer to give off flavours
- For extra piece of mind see section on "Sanitising"
General Use
- Rinse your KROWLER with hot water to kill off any bacteria if you have not used your KROWLER in a while
- Let the KROWLER dry (cap off) or cool down before you fill with beer (filling it warm will cause excessive foam or alter the taste of your beer)
Recommended
- Use food-safe no-rinse sanitisers like Iodophor or Starsan to sanitise your KROWLER just before filling
- You may purchase brewery grade sanitisers from any home brew shops
General Cleaning
- After the beer in the KROWLER has run out, rinse it immediately with warm water
- You may fill the KROWLER with hot water, swirl it around and attach the regulator with remaining CO2 cartridge to purge hot water through the dip tube and beer tap
Deep Cleaning
- For tough stains or unpleasant odors, use distilled white vinegar and/or baking soda
- For odors, fill the KROWLER about a quater way with distilled white vinegar and top it off with warm water. Give it a little shake and let it soak overnight. Rinse well and dry completely
- For stains, add a small amount of baking soda with hot water, shake well and let it sit for an hour or so. Pour out and rinse well with hot water.
Recommended
- Use brewery-grade alkali cleaners such as Powdered Brewery Wash (PBW) for extra convenient cleaning
- You may purchase PBW at any home brew stores
- Always store your KROWLER clean and dry in a cool environment
- If you can't clean it immediately after use, keep it cold and wet with some water. Do not allow beer remnants to dry
- Store your KROWLER with the cap off to ensure that it remains completely dry. A moist environment is perfect for bacteria growth
- Note: you may need to depress the tap valve on the coupler manually and shake out water trapped inside
CO2 Pressure Guide
- 1-2 PSI is enough to dispense beer
- Always turn the regulator slowly and do not over pressurise
Follow this rough guide to keep your brews at the correct carbonation
Note: this is just a guide and some trial and error is expected to find the perfect pressure for different beers
Stouts, Porters, Cream Ales, Barley Wine
3-6 PSI
Amber, Brown, Red Ales
5-8 PSI
IPA, Pale Ale, Wheat Beers
7-10 PSI
Largers, Pilsners, Ciders, Kombucha
9-12 PSI
Wine, Soda, Sparkling Water
12 – 15 PSI
Troubleshooting
- Sorry we have to ask. Is there beer in the KROWLER?
- Check that a CO2 cartridge is installed in the regulator (attached to the KROWLER), the regulator is turned on and there is pressure indicated on the pressure gauge
- Install a fresh CO2 cartridge if there is no pressure
- If there is pressure but beer still does not come out, there could be a blockage in the dip tube. Switch off the regulator and purge the KROWLER completely before removing the cap and coupler to check for any blockage
- Check that the pressure in the KROWLER is no more than 1-2 PSI. Use the purge valve to release excess pressure.
- The first pour may be foamy if the beer tap is warm. Subsequent pours should be less foamy when the tap has cooled by the beer. Tip: You may wish to store your tap in the fridge to get a perfect pour each time.
- If the beer continues to pour with excessive foam, it may be over-carbonated at the brewery or tap room. Release some pressure and allow the beer to settle for a while
- You may need to let the beer settle if it has been shaken excessively during transportation
- Always open the tap fully, controlling the flow using the tap handle would result in excessive foam
- Unfortunately your beer may have been contaminated (by bacteria) during filling due to a dirty growler or improper filling
- Read these instructions for tips on how to sanitise your KROWLER
- While KROWLER can help to preserve the freshness of your beer longer, it does not keep it forever. It is best to consume your beers within 2 - 3 weeks
- Check that the regulator is closed before you install the CO2 cartridge. See "Assembly"
- It is normal for some gas to leak out during when installing a new CO2 cartridge, continue to screw the cartridge in until it is sealed against the regulator
- Check that the rubber O-rings on the cap and coupler are present and seated properly
- If they are damaged, contact us for replacement
- Beer has dried up in the tap
- Remove the tap from the KROWLER and run it under hot water
- Work the tap back and forth until it is free
- Do not force the tap open
- Always rinse the tap under warm water once you are done dispensing beer
- Some drips after pouring are normal. Use a bar mat or the protective rubber cap to keep things clean
- If the tap drips excessively, the coupler valve or the seal in the tap could be faulty. Please contact us to resolve this